Git and GitHub Unraveled: A Beginner's Guide to Streamlined Coding and Team Coordination
Hey, fellow coding enthusiasts! Today, we're going to delve into the amazing world of Git and GitHub. So, grab your virtual hard hats and let's explore what makes them so awesome!
So, What is Git?
Well, Think of Git as a superhero for coders. It keeps a record of all the changes you make to your code, so you don't lose anything. Imagine working on a project with friends, and everyone's making changes. Git comes to the rescue by saving all those changes like a magic time-traveling machine. It remembers every little change you make, so you can roll back to a previous version if things go haywire. No more hair-pulling when you accidentally delete that brilliant code chunk you wrote!
Why is Git distributed?
Good question! Git is distributed because it gives you the freedom to work anywhere, anytime. In a distributed system, each coder has their own complete copy of the project's code.You can work on your code offline, and when you're ready, you "push" your changes to a shared central repository, like GitHub, and sync up with the rest of the gang. It's like a coding adventure with your own space to roam!
Ah, but what about GitHub?
GitHub is like the coolest coding hangout on the web! It's a web-based hosting service that works like a charm with Git. When you store your code on GitHub, it's like giving your project a cozy home where other developers can see, collaborate, and contribute to your coding brilliance! It's also a hub for open-source projects, where developers from all over the globe come together to create awesome stuff.
Wait, wait, let's clear this up—Git vs. GitHub.
Absolutely! Git and GitHub are two different stars in the coding galaxy. Git is the brainy version control system that keeps track of your code changes. On the other hand, GitHub is the online stage where your code gets to shine! Think of Git as the silent genius working backstage, and GitHub as the friendly spotlight where your code dances and dazzles the world!
Let's walk through the Git workflow step-by-step:
- Git Init - Setting up the Playground
When you start a new project or want to use Git for version control, you begin by creating a Git repository with the command:
git init
This command sets up the playground for your code. It creates a hidden folder called ".git," which is like the brain of your repository. The ".git" folder is responsible for tracking all the changes you make to your files.
- Git Add - Picking the Players
Now that you have a playground, you need to tell Git which files you want to include in your game. You use the command:
git add .
where the dot (".") means "all files." This adds all the files in your project to the staging area. Think of the staging area as a selection box—files in the staging area are ready to be committed.
- Git Commit - Saving Your Progress
Once you've chosen the files for your game, it's time to save your progress with a commit. A commit is like taking a snapshot of your code at a particular moment. You use the command:
git commit -m "Your commit message here"
When you commit, you add a short message describing what you did, so you and others can understand the changes later.
- Git Push - Sharing Your Creation
Now comes the exciting part! You can share your creation with others by pushing your local repository to a remote repository, usually hosted on a service like GitHub. To do this, you use the command:
git push origin
In this command, "origin" is the default name for the remote repository. If you have set up multiple remotes, you can replace "origin" with the name of your remote repository.
If this is the first time you are pushing to the remote repository, you might need to set the upstream branch using the -u flag like this:
git push -u origin <branch-name>
Replace <branch-name> with the name of the branch you want to push.
Remember, before pushing, make sure you have committed your changes using git commit, and ensure you have the necessary permissions to push to the remote repository.
If you are pushing to a private repository, you might need to provide your credentials (username and password) the first time you push. For added security, consider using SSH keys or access tokens instead of passwords.
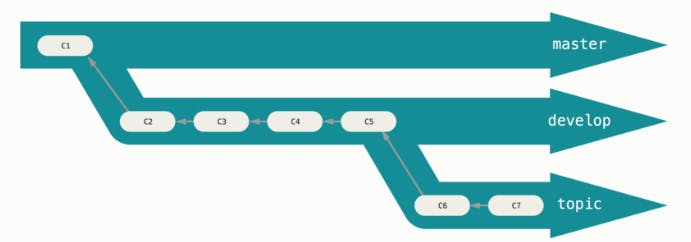
Last but not least, let's unravel the mystery of Git branching!

Oh, Git branching is like having superpowers for your coding journey! Imagine you want to try out some new ideas or experiment without messing up the main code. Well, you create a new branch—a separate path for your coding adventures! It's like having your own parallel universe for coding creativity! When you're happy with your changes, you "merge" them back into the main code. It's like mixing the best ideas into one big project!